
Sugru - derived from the Irish language "sugradh" for "play" is a multi purpose non-slumping version of Silicone that resembles modeling clay or Plasticene.
Sugru was developed by Irish sculptor Jane Ni Dhulchaointig resulting from her need to hack stuff to make them function better. Sugru can be modeled just like clay, applied to the surface, shaped and then left to cure for 24 hours. On curing it forms a permanent bond with the host material and is waterproof, dishwater proof and flexible and can handle a temperature range from -60 to +180 degrees Celcius.
I can already think of a few places where I could use this product.
Here's Jane describing Sugru.
Wednesday, September 8, 2010

Quick Update
Forgive me readers for I have not blogged!!!

It's been 2 months since my last post.
Wow Summer really took us by storm this year. And yet I feel that we managed to accomplish a fair amount. The girls did an entire season of soccer just missing a game apiece, upped two levels in swimming and maintained their piano schedule without missing a heartbeat.
Thanks to Karl and Elva, we went from camping virgins to veterans in one season. And boy did we enjoy that!!! We were to go for yet another trip before the start of school, but pulled out - and what luck. It was cold and rainy the entire weekend. The best part - sitting by the campfire after Lynda and the girls had retired to the tent. Just me under the stars reading!! Bliss!!
On the home front, the laundry alcove was completed, the machines installed, plumbed, vented and were being used for the past month. No complains, leaks or electrocutions were experienced. Pictures will follow.
Mike and I redid the entire plumbing stack at the rear, pushing it close to the wall and making provisions for the relocated water heater. We moved the water heater, reconfigured the flue and restarted the unit. Pictures and a separate post to follow.
On the main level, we had removed the carpet in July. The thin strip oak hardwood beneath the underlay was thankfully in fantastic condition. Next I pulled out the walls that the PO had covered in popcorn (acoustic texture). With the walls out, I had the chance to rewire the hallway lighting, effectively separating the outside lights and running one on an automated timed. I also wired in sconces on the interior wall, installed a provision for a future dated central vacuum, installed provisions for cable, phone and data near the existing power sockets. Unfortunately nowhere in Canada can I get Decora inserts for Keystone jacks. That will have to be ordered in from Parts Express. The actual inserts will be ordered from Monoprice.
I've also removed the popcorn from the ceiling and am in the process of smoothening out the surface. Finally, the cutout between the kitchen and the living room it slated to become a proper opening. More on that in another post.
And finally....
Coach is one year old today.

Happy Birthday Coach!!!!!
Monday, June 28, 2010
Doing a Number on the House
I've wanted to change our house numbers ever since we purchased our place, but the offerings in the local hardware stores did not meet my approval and size requirements. I knew what I wanted and that was numbers that were over 10" high digits in a sans serif font. Ordering the fonts were an option, but with estimates of USD 260 ++ for the set, the house numbers did not seem that important.
Last month, I decided to do the 'D'Souza Thing' and cut my own numbers based on a font that I downloaded from 'dafont.com'. I cut them on the scroll saw from 3/4" Baltic Birch Ply. I then painted the numbers, electric outlet covers and mailbox in Rustoleum's "Heirloom White"
The numbers stand 1" proud of the wall. Clear silicone caulk and threaded inserts hold them in place.
I got what I wanted, at a fantastic price, and I think that it looks great!!!


Last month, I decided to do the 'D'Souza Thing' and cut my own numbers based on a font that I downloaded from 'dafont.com'. I cut them on the scroll saw from 3/4" Baltic Birch Ply. I then painted the numbers, electric outlet covers and mailbox in Rustoleum's "Heirloom White"
The numbers stand 1" proud of the wall. Clear silicone caulk and threaded inserts hold them in place.
I got what I wanted, at a fantastic price, and I think that it looks great!!!

Before and After

Close up showing the stand-offs
Saturday, May 8, 2010
Washroom & Laundry Room Build - Part 8 - Plumb Crazy
I just finished getting the laundry plumbed in courtesy of my plumber of choice and Brampton historian Mike Billings. I had Mike over initially and detailed to him exactly what I wanted. To which he replied - there's an easy way and there's a difficult way, and what you want does not fall into either of those categories. But I got what I wanted anyways. Since I was closing off access to the main shut off valve in the house, I decided to relocate the valve to somewhere more accessible, and since the laundry pair would be in an alcove, I wanted the shutoff valves to the hot and cold to be just as easily accessible. I installed full bore valves so as to not compromise flow. So here's where I am with my laundry installation.


Mike wanted a picture as he's never done something like this in his entire career.

The laundry outlets. I chose screw on nipples as they provide me with options. Plus IMO it's the better way to go.

The alcove framed. Now that the plumbing is done, I will do some cross bracing and the electrical work before drywalling and painting.
So. There's a reason why I referred to Mike as Brampton's historian. He always regales me with tales of work that he's done in both old and new Brampton. But this one was probably the best I've heard. While driving him after work, I noticed that T&A's on Queen street was closed and the premises up for sale. Mike informed me that the owner had passed away last summer and a takeover plan had fallen through. Then he asked me what T&A's stood for. The obvious - I replied. But according to Mike that's not what's registered at the Brampton Board of Trade. So here's the logo. You tell me what you think it stands for and then scroll below for the official registered name.....

T&A's Logo
T&A stands for Teamwork and Attitude!!!! But you guessed that already didn't you ?????
Sunday, March 28, 2010
Washroom & Laundry Room Build - Part 7 - Tin Knockers
11 months ago I did my last post on the build diary for the washroom and took a hiatus while I worked on outdoor projects in the summer. During that time I looked around for a Sheet Metal Worker (AKA Tin Knockers) to modify the HVAC ducting under the stairs to allow for more headroom. Most of the companies that I found in the yellow pages only worked on new projects and most did not want to go next to a retrofit. I had decided that I would undertake the job by myself even if it meant buying a few sheet metal tools. All I needed to get were the 90 degree elbows for the supply and return sections.
I located the supplier in Alberta and saw that Lowe's were their local distributor. A trip to Lowe's however confirmed the worst. Those pieces were only sold to the trade.... Then Andrew (from the plumbing department at Lowe's) put me in touch with Chris who was apprenticing as a Tin Knocker with a local builder and I finally got the work done...
Chris spent close to 3 hours yesterday and gave me exactly what I wanted.
Next step will be to frame in the alcove for the washer and dryer, complete the plumbing and finish the electrics.


I located the supplier in Alberta and saw that Lowe's were their local distributor. A trip to Lowe's however confirmed the worst. Those pieces were only sold to the trade.... Then Andrew (from the plumbing department at Lowe's) put me in touch with Chris who was apprenticing as a Tin Knocker with a local builder and I finally got the work done...
Chris spent close to 3 hours yesterday and gave me exactly what I wanted.
Next step will be to frame in the alcove for the washer and dryer, complete the plumbing and finish the electrics.

Before: The ducts were almost 8 inches away from the bottom of the stairs

After: A new 90 degree elbow and the existing 45's take the ducting close to the stairs.
Sunday, March 21, 2010
Boxing Plain Air
Lynda plans to do some art workshops this summer and to do so, she would either have to carry her large easel into the field along with paints and sundry or she could get herself a 'Pochade Box'. A Pochade box (Pochade being French for 'quick sketch') is a small box that mounts directly onto a tripod and acts as an easel as well as storage for a wet palette and paints. En Plein Air or Plein Air is the act of painting outdoors or in the open.
Good quality Pochade boxes cost anywhere from 100 to upwards of 500 dollars. Really!! Someone must think that artists make money!!!!
I got a table top art kit from XSCargo for 19.99, which would normally be used on a smooth surface. The lid doubles as an easel with the paint storage on the opposite side of the painter. I completely dismantled the box and installed heavy duty brass hinges on the adjacent side. I reoriented the the lid stays so that the box would open to it's maximum at approximately 110 degrees. The base was reinforced with 1/4" MDF and I installed a 1/4"-20 T nut into the base. The tripod would then be affixed to this.
As a final touch I heat transferred Lynda's 70Popes logo on the lid such that it would be right side up in the open position.
Now all Lynda has to carry with her will be the Pochade box and a tripod.


Good quality Pochade boxes cost anywhere from 100 to upwards of 500 dollars. Really!! Someone must think that artists make money!!!!
I got a table top art kit from XSCargo for 19.99, which would normally be used on a smooth surface. The lid doubles as an easel with the paint storage on the opposite side of the painter. I completely dismantled the box and installed heavy duty brass hinges on the adjacent side. I reoriented the the lid stays so that the box would open to it's maximum at approximately 110 degrees. The base was reinforced with 1/4" MDF and I installed a 1/4"-20 T nut into the base. The tripod would then be affixed to this.
As a final touch I heat transferred Lynda's 70Popes logo on the lid such that it would be right side up in the open position.
Now all Lynda has to carry with her will be the Pochade box and a tripod.

Not exactly what I bought, but similar in structure.

The box on the tripod

The lid will serve to hold the canvas or art board

I've had to relinquish ownership of my tripod..... and my lovely Manfrotto head!!!

From the rear
Shot Full of Holes
Strictly a North American topic this, as we're plagued by the the inevitable 'qualified' cable and phone man who drills holes all around the house seeking the easiest means of ingress for their cable and phone services. My home was not spared and I had no less than 5 holes drilled around the house. More that the holes, was the amount of cable that snaked itself around the perimeter of the house. Most of these were redundant and I set about simplifying the method of ingress for current and future services to the house.
I decided to run a length of conduit from the outside of the house to the location of the distribution panel inside the house and then run cables along with a few spares for any future services.
Here are the tools and materials that I used for the job.
1" Conduit - 2 lengths - Courtesy of my cousin Karl
1" 90 & 45 degree bends - as required - Home Depot
1" junction box for the outside - Home Depot
PVC Adhesive - Home Depot
1 1/2" Bi-Metal Hole Saw - I have this
1 1/2" Carbide Grit Hole Saw - Lowe's
From the inside, I approximated the point of ingress and used the carbide hole saw to make the starter hole through the brick. I followed this up with the bi-metal hole saw to drill through the wood. An extender is required as the hole saw has to pass through one course of bricks and then through 3 inches of wood.
I then ran the conduit, cementing the necessary adapters in place to get the cables to where I wanted them to go. Sealed off the inside and outside holes with expanding foam and silicone respectively and anchored the conduit to the floor joists.
I ran three RG-6 cables, two to the Rogers box, one to the HDTV antenna and one Cat6 cable to the Bell box. The conduit itself has enough space for another three cables. As it stands, the Cat6 and one RG-6 cable have no immediate function as a single RG-6 carries both the phone and the internet and could also carry cable if so desired at a later date.


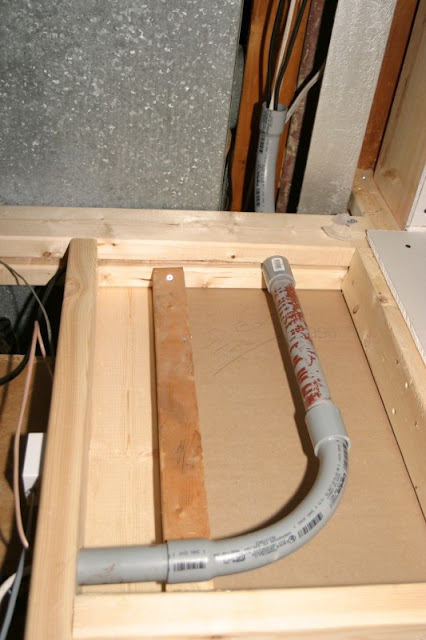

I decided to run a length of conduit from the outside of the house to the location of the distribution panel inside the house and then run cables along with a few spares for any future services.
Here are the tools and materials that I used for the job.
1" Conduit - 2 lengths - Courtesy of my cousin Karl
1" 90 & 45 degree bends - as required - Home Depot
1" junction box for the outside - Home Depot
PVC Adhesive - Home Depot
1 1/2" Bi-Metal Hole Saw - I have this
1 1/2" Carbide Grit Hole Saw - Lowe's
From the inside, I approximated the point of ingress and used the carbide hole saw to make the starter hole through the brick. I followed this up with the bi-metal hole saw to drill through the wood. An extender is required as the hole saw has to pass through one course of bricks and then through 3 inches of wood.
I then ran the conduit, cementing the necessary adapters in place to get the cables to where I wanted them to go. Sealed off the inside and outside holes with expanding foam and silicone respectively and anchored the conduit to the floor joists.
I ran three RG-6 cables, two to the Rogers box, one to the HDTV antenna and one Cat6 cable to the Bell box. The conduit itself has enough space for another three cables. As it stands, the Cat6 and one RG-6 cable have no immediate function as a single RG-6 carries both the phone and the internet and could also carry cable if so desired at a later date.

Not my house, but my neighbors. It illustrates the kind of situation that I had as well. That's the Bell box on the main Hydro pole

The Rogers box mounted in another location

After - The Rogers box moved closer to the Hydro pole and the Bell box
The smaller box is the cable ingress.

From the inside. I got carried away with the expanding foam. This will all be covered when the headers have been insulated

The cables exiting before reentering the wall cavity. This part will be covered with a removable service panel

The conduit in the wall cavity. Will be sealed with drywall

Finally entering the service panel
DIY Selective Focus Lens
If you've ever seen photos from Selective Focus Lenses, you'd know what I'm talking about. Pictures where parts of the image even though in the same plane are completely blown out of focus. Sure you could go out and buy yourself a production lens. Lensbaby makes a range that start at USD 100+ for plastic optics and USD 300+ for glass optics. Canon and Nikon make Perspective control or Tilt-Shift that cost in the thousands. That's money better spent on other stuff. Besides..... where's the fun?????
I started off, as I always do, by trolling the Interwebs for information. There are a couple of ways of approaching a solution. The better of them involves getting your hands on a Medium Format Lens which even on the second hand market cost more than I was willing to spend. The other way to go is to use enlarger lenses and a quick search on Craigslist garnered me a complete enlarger replete with a 50mm and a 75 mm lens for CAD 40.00
I collected the unit yesterday and was really eager to kludge together the contraption. I say kludge, because this is exactly what I did. I harvested the lens mount with the bellows and pressed it against the SLR body to see what sort of images I would get. I threw the aperture wide open and set the shutter to 1/60 of a second and wished myself luck.
In the coming days, I will attach the bellows to a spare body cap and try to figure out a way to hold the lens in the desired position without requiring more that two hands for the entire process. I'm also looking for 105mm and 135mm lenses with M39 thread. Know of anyone who has these lying around?????
So here are the test shots, very Holga-esque complete with light leakage and everything. The images were shot around 5 in the evening of what was a very dull day. No post processing was attempted or done on any of the images.

First shot. Near the kitchen window. Tried to keep the nose in focus.

Our outdoor Chandelier. I tried to focus on the center spar

Christmas lights on the tree. The lights are all in the same plane, yet only the center light is in focus.

The hinge on my Garden Shed

This is with the 50mm lens. I had to go in really close, but I like the way it's filled the frame.
Wednesday, February 17, 2010
How to Transfer Patterns to Wood
This evening my Aunt asked me to prepare a '25' sign for a cake that she is decorating for a weekend celebration. The last time I made a '50' for her from cardboard. Since I wanted this one to be more durable, I decided to cut the '25' from MDF.
You could say that I decided to up the ante for my aunty!!!!
Probably the most difficult part of the entire process lay in the transferring of the image onto the MDF sheet. I could've printed out the image onto self adhesive paper and stuck it onto the sheet. Unfortunately the scroll saw would rip up the paper as I made the cut. I could've used carbon paper to transfer the image onto the sheet, but my skills with tools far exceed those with a pen. In short - my handwriting is crap.
I decided to employ a little bit of science instead. Modern laser printers and copiers use powdered toner and heat to fuse the toner onto the paper. I assumed that if heat would then be applied to the toner it would remelt and transfer to the sheet.... Armed with this exhaustive research, I set about the task of applying pattern to MDF .


You could say that I decided to up the ante for my aunty!!!!
Probably the most difficult part of the entire process lay in the transferring of the image onto the MDF sheet. I could've printed out the image onto self adhesive paper and stuck it onto the sheet. Unfortunately the scroll saw would rip up the paper as I made the cut. I could've used carbon paper to transfer the image onto the sheet, but my skills with tools far exceed those with a pen. In short - my handwriting is crap.
I decided to employ a little bit of science instead. Modern laser printers and copiers use powdered toner and heat to fuse the toner onto the paper. I assumed that if heat would then be applied to the toner it would remelt and transfer to the sheet.... Armed with this exhaustive research, I set about the task of applying pattern to MDF .

I prepared a vector image of 2 & 5 overlapping as desired

Flipped the image.....

Soldering iron with a flat iron tip. In the background, Lynda and myself in Dubai, circa 1993 looking far cooler that the legally allowable limit at the time!!!!

The paper taped in place and ironed slowly over the pattern

The '25' transferred onto the MDF
Tomorrow I cut out the shape and paint it. The above process would not work with an Ink Jet printer as it uses a liquid which then dries. Besides why would you want to use a medium which uses the most expensive liquid in the world????
Think I'm kidding??? Check this out!!!!!
Monday, February 15, 2010
Life Après Ski
This month Lynda and her team decided to run a campaign to coincide with the Winter Olympics in Vancouver. As with all of her campaigns, she needed the right decor to set the mood for the Call Centre. The initial decision was to reprint some of the Vancouver 2010 posters, but this posed a challenge as the beams in the Call Centre are fairly narrow. I threw an idea into the mix of having skis done up in "Team DHL" colors and they seemed to like the idea a lot and how soon could I do??? Well I had not really planned on doing this myself, but the challenge was inviting and I set about the task of converting a bunch of old skis into wall art.

First task. Run around like a headless chicken to a total of 5 Goodwill stores to get 10 pairs of skis. Get them home, open up all the bindings and sand it down with progressive grades of sandpaper. The skis were fairly dinged but what can you expect for CAD 10.00 a pair......
The skis were then painted in Rustoleum's Marigold which I had painted the CS First shield that I had made for Lynda in June of 2009. The paint gave me the most problems with some of the skis blistering and some not adhering at all. But I got through it and in the end they came out pretty well.

I had got DHL logos done on kiss cut stickers and they were laid on as soon as the paint had dried.

Next it was time to put the bindings back on and a small hook on the rear for hanging.

Here are skis all lined up and ready to be transported to DHL

We went over to DHL this evening and hung them up on the beams.
So you see.... there is Life Après Ski!!!!
Thursday, February 11, 2010
A Whole Lotta Love
It's become tradition in our house for the girls to give Valentine Day cards to all of their classmates. Last year and the year before that, the girls made the card of foam sheets and cutouts from the dollar store.
This year we decided to up the ante by printing custom cards for the girls. I involved them in the process and they were willing participants even if it meant just moving the cards from the printing table to other surfaces for drying.
I based the design on the famous I ♥ N Y rebus created by William Glasser in the late Seventies for the New York state marketing campaigns. The font for the heart is a free font from Dafont.com.
This was my first experience with mixing process (CMYK) colors and we achieved a fair enough mix for the heart. The front and the rear were printed a few hours apart as Acrylic inks dry very fast.
As an afterthought I decided to print the heart on the envelope as well carrying the theme through both the card and the envelope.

The cards laid out to dry

The rear of the cards. I tried to do this 'Postcard' style

The envelopes. I'm glad I did this
This Justin!!
He's taken over the airwaves. Our little Wunderkind from Stratford, Ontario. Justin Bieber, famous for busking outside the Avon Theater in Stratford has gained a fan following from my daughters who know most of his songs to the letter. I too am not ashamed to admit that I crank up the volume in the car and sing along when he's on.
My question here is not whether I like the new song 'Baby' by Justin featuring Ludacris, but of the two, who's piggybacking on whose career???
My question here is not whether I like the new song 'Baby' by Justin featuring Ludacris, but of the two, who's piggybacking on whose career???
Justin on the steps of the Avon Theater busking to pay for creature comforts
'Baby' by Justin Bieber featuring Ludacris
Baby, baby, baby nooo
My baby, baby, baby nooo
My baby, baby, baby nooo
I thought you'd always be mine, oh oh
Monday, February 8, 2010
Center Speaker Challenge - Part Deux
Meanwhile back in the shed.......
This evening I drilled the holes for the tweeter and the binding plate with a 2 ⅛" hole saw and cut out the holes for the woofers with the jigsaw. I then glued and screwed the entire box together before attaching all of the components to the box.

Okay, so I'll be the first to admit that it looks like crap, but it's an in-wall speaker that will be hidden in it's entirety by a grille.
I'm still working on options for the grille and hope to have an idea by tomorrow.
This evening I drilled the holes for the tweeter and the binding plate with a 2 ⅛" hole saw and cut out the holes for the woofers with the jigsaw. I then glued and screwed the entire box together before attaching all of the components to the box.

Okay, so I'll be the first to admit that it looks like crap, but it's an in-wall speaker that will be hidden in it's entirety by a grille.
I'm still working on options for the grille and hope to have an idea by tomorrow.
Sunday, February 7, 2010
Center Speaker Challenge
First off.... why the hell won't the Yanks realize that it's actually spelled 'centre' and 'realise'
Anyhoo.....
So I realized that my Center Channel speaker has nowhere to sit in my current setup. But I need it set up so that we can watch American Idol in glorious Dolby Digital!!! With only the Left and Right speakers on, all I get is music minus the vocals. That won't fly....
So I decided to cannibalize my existing center speaker and fit it between the studs under the TV. I'm no audio expert, so I started my attempting to match the old speaker volume to the new enclosure that I planned to build. Luckily I stayed awake during geometry. I had a few constraints. The space between the studs was 15 inches and the max depth was the depth of the stud. i.e. 3.5 inches. I also wanted to have some space between the studs to run the cabling from the DVD, Amp etc. up to the TV.
This afternoon I cut the wood. It was only -5 - wonderful weather for working outside. NOT.
Tomorrow I will make the cutouts for the drivers and glue and assemble.


Anyhoo.....
So I realized that my Center Channel speaker has nowhere to sit in my current setup. But I need it set up so that we can watch American Idol in glorious Dolby Digital!!! With only the Left and Right speakers on, all I get is music minus the vocals. That won't fly....
So I decided to cannibalize my existing center speaker and fit it between the studs under the TV. I'm no audio expert, so I started my attempting to match the old speaker volume to the new enclosure that I planned to build. Luckily I stayed awake during geometry. I had a few constraints. The space between the studs was 15 inches and the max depth was the depth of the stud. i.e. 3.5 inches. I also wanted to have some space between the studs to run the cabling from the DVD, Amp etc. up to the TV.
This afternoon I cut the wood. It was only -5 - wonderful weather for working outside. NOT.
Tomorrow I will make the cutouts for the drivers and glue and assemble.

Infinity - Not sure of the model. I have even forgotten when I bought this

Drivers removed. Simple MTM format

The drivers are in very good shape. Mid woofers are shielded - a fallout from CRT times

The crossover mounted directly onto the binding plate. The woofers are in series.

Calculating... Very calculating!!! Yes I have crap writing.....
Panel Holder
The other day Lynda sent me a link to a website that showed a Panel Holder that was built by the husband of an artist that she follows. It was a practical fix to a problem encountered by most artists who paint on smaller panels or canvasses. It was not an expensive item, but having the same shipped over to Canada from the States would've increased the price considerably. So I decided to have a go at it myself.


I had some 1/8" MDF lying around from barricades that I had made to keep the dog confined to the kitchen when I had to leave him alone at home. Poor dog.
I made a small improvement on the original in that I beveled the sliding members so as to provide a sort of a lock. It can comfortably accommodate panels ranging from 6" to 11" height
Lynda was impressed and I got me some brownie points.....

With a 7" x 7" panel in place

With a 8" x 8" panel in place

Close-up showing the beveled support

Close up showing the beveled support and sliding member
Thursday, February 4, 2010
Screen Prince
Back in the Eighties, fresh out of high school, I was offered a job by one of my father's customers. I was to drill 0.77mm holes at a 1mm offset from the circumference. This was to facilitate the insertion of an eye ring through which was passed a ribbon. The end product was a sports medal and I was paid 10 paise per hole. During the normal sports season in Bombay, I drilled more than 5000 holes in the brass discs. Bosco Enterprises pretty much had the market tied up.
It took many processes to get to the finished product from the sheet of brass, of which the drilling of the holes and the tying of the ribbon were the only two processes which were done in house. The rest of the work was subcontracted.
I convinced Bosco that I could do the artwork in house - which I the did, thus lining my pockets with more rupees to spend on more books. I then went for a course in screen printing and convinced Bosco that we could do the printing in house as well, making me slightly richer, and Bosco exponentially wealthier!!! By the time I left Bosco in 1990, we were etching in house as well.
Which brings me to the Post Title.
I've decided to start screen printing all over again. I have a vague idea of what it is that I want to produce, but I'm keeping that under wraps for now. I decided to build myself a table on which to print as all of the other tables in the house are standard height and I wanted to have counter top height so as to alleviate the stress on my back. I also chose to incorporate an exposure station within the table so that I have less stuff floating around when not in use.
Here in picture is what I've accomplished so far.


It took many processes to get to the finished product from the sheet of brass, of which the drilling of the holes and the tying of the ribbon were the only two processes which were done in house. The rest of the work was subcontracted.
I convinced Bosco that I could do the artwork in house - which I the did, thus lining my pockets with more rupees to spend on more books. I then went for a course in screen printing and convinced Bosco that we could do the printing in house as well, making me slightly richer, and Bosco exponentially wealthier!!! By the time I left Bosco in 1990, we were etching in house as well.
Which brings me to the Post Title.
I've decided to start screen printing all over again. I have a vague idea of what it is that I want to produce, but I'm keeping that under wraps for now. I decided to build myself a table on which to print as all of the other tables in the house are standard height and I wanted to have counter top height so as to alleviate the stress on my back. I also chose to incorporate an exposure station within the table so that I have less stuff floating around when not in use.
Here in picture is what I've accomplished so far.

I got the pieces cut at the Depot. They don't charge me for cuts anymore... Not sure why.
I wear my ring....

I employed Lynda's drafting table so that I could work at a comfortable height

Basic framework done

GraLab Darkroom Timer for accurate exposures - Retails for over USD 100.00
Got it for CAD 5.99 at the Value Village
Twin 500 W halogens with the safety glass removed

The exposing glass in place. The table top hinges out of the way.

With the tabletop back in place
Subscribe to:
Posts (Atom)

