Wednesday, February 17, 2010

How to Transfer Patterns to Wood

This evening my Aunt asked me to prepare a '25' sign for a cake that she is decorating for a weekend celebration. The last time I made a '50' for her from cardboard. Since I wanted this one to be more durable, I decided to cut the '25' from MDF.

You could say that I decided to up the ante for my aunty!!!!

Probably the most difficult part of the entire process lay in the transferring of the image onto the MDF sheet. I could've printed out the image onto self adhesive paper and stuck it onto the sheet. Unfortunately the scroll saw would rip up the paper as I made the cut. I could've used carbon paper to transfer the image onto the sheet, but my skills with tools far exceed those with a pen. In short - my handwriting is crap.

I decided to employ a little bit of science instead. Modern laser printers and copiers use powdered toner and heat to fuse the toner onto the paper. I assumed that if heat would then be applied to the toner it would remelt and transfer to the sheet.... Armed with this exhaustive research, I set about the task of applying pattern to MDF  .

I prepared a vector image of 2 & 5 overlapping as desired

Flipped the image.....

Soldering iron with a flat iron tip. In the background, Lynda and myself in Dubai, circa 1993 looking far cooler that the legally allowable limit at the time!!!!

The paper taped in place and ironed slowly over the pattern

The '25' transferred onto the MDF

Tomorrow I cut out the shape and paint it. The above process would not work with an Ink Jet printer as it uses a liquid which then dries. Besides why would you want to use a medium which uses the most expensive liquid in the world????

Think I'm kidding??? Check this out!!!!!

Monday, February 15, 2010

Life Après Ski

This month Lynda and her team decided to run a campaign to coincide with the Winter Olympics in Vancouver. As with all of her campaigns, she needed the right decor to set the mood for the Call Centre. The initial decision was to reprint some of the Vancouver 2010 posters, but this posed a challenge as the beams in the Call Centre are fairly narrow. I threw an idea into the mix of having skis done up in "Team DHL" colors and they seemed to like the idea a lot and how soon could I do??? Well I had not really planned on doing this myself, but the challenge was inviting and I set about the task of converting a bunch of old skis into wall art.


First task. Run around like a headless chicken to a total of 5 Goodwill stores to get 10 pairs of skis. Get them home, open up all the bindings and  sand it down with progressive grades of sandpaper. The skis were fairly dinged but what can you expect for CAD 10.00 a pair......

The skis were then painted in Rustoleum's Marigold which I had painted the CS First shield that I had made for Lynda in June of 2009. The paint gave me the most problems with some of the skis blistering and some not adhering at all. But I got through it and in the end they came out pretty well.


I had got DHL logos done on kiss cut stickers and they were laid on as soon as the paint had dried.


Next it was time to put the bindings back on and a small hook on the rear for hanging.


Here are skis all lined up and ready to be transported to DHL


We went over to DHL this evening and hung them up on the beams.

So you see.... there is Life Après Ski!!!!

Thursday, February 11, 2010

A Whole Lotta Love

It's become tradition in our house for the girls to give Valentine Day cards to all of their classmates. Last year and the year before that, the girls made the card of foam sheets and cutouts from the dollar store. 

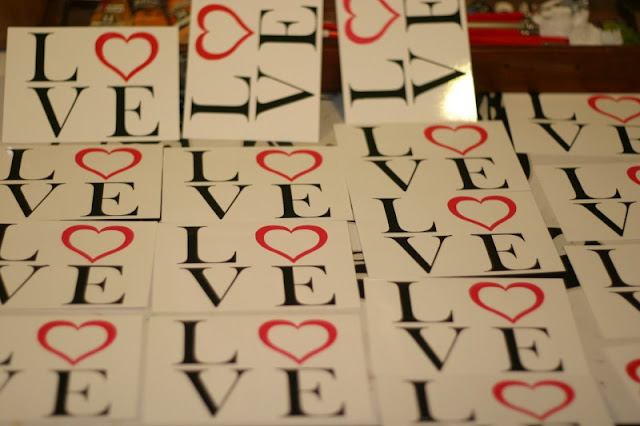
This year we decided to up the ante by printing custom cards for the girls. I involved them in the process and they were willing participants even if it meant just moving the cards from the printing table to other surfaces for drying.

I based the design on the famous I  ♥ N Y rebus created by William Glasser in the late Seventies for the New York state marketing campaigns. The font for the heart is a free font from Dafont.com.

This was my first experience with mixing process (CMYK) colors and we achieved a fair enough mix for the heart. The front and the rear were printed a few hours apart as Acrylic inks dry very fast.

As an afterthought I decided to print the heart on the envelope as well carrying the theme through both the card and the envelope.

The cards laid out to dry

The rear of the cards. I tried to do this 'Postcard' style 

The envelopes. I'm glad I did this

This Justin!!

He's taken over the airwaves. Our little Wunderkind from Stratford, Ontario. Justin Bieber, famous for busking outside the Avon Theater in Stratford has gained a fan following from my daughters who know most of his songs to the letter. I too am not ashamed to admit that I crank up the volume in the car and sing along when he's on.

My question here is not whether I like the new song 'Baby' by Justin featuring Ludacris, but of the two, who's piggybacking on whose career???

Justin on the steps of the Avon Theater busking to pay for creature comforts

'Baby' by Justin Bieber featuring Ludacris

Baby, baby, baby nooo
 My baby, baby, baby nooo
My baby, baby, baby nooo
I thought you'd always be mine, oh oh

Monday, February 8, 2010

Center Speaker Challenge - Part Deux

Meanwhile back in the shed.......

This evening I drilled the holes for the tweeter and the binding plate with a 2 ⅛" hole saw and cut out the holes for the woofers with the jigsaw. I then glued and screwed the entire box together before attaching all of the components to the box.


Okay, so I'll be the first to admit that it looks like crap, but it's an in-wall speaker that will be hidden in it's entirety by a grille.

I'm still working on options for the grille and hope to have an idea by tomorrow.

Sunday, February 7, 2010

Center Speaker Challenge

First off.... why the hell won't the Yanks realize that it's actually spelled 'centre' and 'realise'

Anyhoo.....

So I realized that my Center Channel speaker has nowhere to sit in my current setup. But I need it set up so that we can watch American Idol in glorious Dolby Digital!!! With only the Left and Right speakers on, all I get is music minus the vocals. That won't fly....

So I decided to cannibalize my existing center speaker and fit it between the studs under the TV. I'm no audio expert, so I started my attempting to match the old speaker volume to the new enclosure that I planned to build. Luckily I stayed awake during geometry. I had a few constraints. The space between the studs was 15 inches and the max depth was the depth of the stud. i.e. 3.5 inches. I also wanted to have some space between the studs to run the cabling from the DVD, Amp etc. up to the TV.

This afternoon I cut the wood. It was only -5 - wonderful weather for working outside. NOT.

Tomorrow I will make the cutouts for the drivers and glue and assemble.

Infinity - Not sure of the model. I have even forgotten when I bought this

Drivers removed. Simple MTM format

The drivers are in very good shape. Mid woofers are shielded - a fallout from CRT times

The crossover mounted directly onto the binding plate. The woofers are in series.

Calculating... Very calculating!!! Yes I have crap writing.....

Panel Holder

The other day Lynda sent me a link to a website that showed a Panel Holder that was built by the husband of an artist that she follows. It was a practical fix to a problem encountered by most artists who paint on smaller panels or canvasses. It was not an expensive item, but having the same shipped over to Canada from the States would've increased the price considerably. So I decided to have a go at it myself.

I had some 1/8" MDF lying around from barricades that I had made to keep the dog confined to the kitchen when I had to leave him alone at home. Poor dog.

I made a small improvement on the original in that I beveled the sliding members so as to provide a sort of a lock. It can comfortably accommodate panels ranging from 6" to 11" height

Lynda was impressed and I got me some brownie points.....

With a 7" x 7" panel in place

With a 8" x 8" panel in place

Close-up showing the beveled support

Close up showing the beveled support and sliding member

Thursday, February 4, 2010

Screen Prince

Back in the Eighties, fresh out of high school, I was offered a job by one of my father's customers. I was to drill 0.77mm holes at a 1mm offset from the circumference. This was to facilitate the insertion of an eye ring through which was passed a ribbon. The end product was a sports medal and I was paid 10 paise per hole. During the normal sports season in Bombay, I drilled more than 5000 holes in the brass discs. Bosco Enterprises pretty much had the market tied up.

It took many processes to get to the finished product from the sheet of brass, of which the drilling of the holes and the tying of the ribbon were the only two processes which were done in house. The rest of the work was subcontracted.

I convinced Bosco that I could do the artwork in house - which I the did, thus lining my pockets with more rupees to spend on more books. I then went for a course in screen printing and convinced Bosco that we could do the printing in house as well, making me slightly richer, and Bosco exponentially wealthier!!! By the time I left Bosco in 1990, we were etching in house as well.

Which brings me to the Post Title.

I've decided to start screen printing all over again. I have a vague idea of what it is that I want to produce, but I'm keeping that under wraps for now. I decided to build myself a table on which to print as all of the other tables in the house are standard height and I wanted to have counter top height so as to alleviate the stress on my back. I also chose to incorporate an exposure station within the table so that I have less stuff floating around when not in use.

Here in picture is what I've accomplished so far.

I got the pieces cut at the Depot. They don't charge me for cuts anymore... Not sure why. 
I wear my ring....

I employed Lynda's drafting table so that I could work at a comfortable height

Basic framework done

GraLab Darkroom Timer for accurate exposures - Retails for over USD 100.00
Got it for CAD 5.99 at the Value Village
Twin 500 W halogens with the safety glass removed  

The exposing glass in place. The table top hinges out of the way.

With the tabletop back in place

70 Popes


Just this morning Lynda launched her Etsy shop to sell her paintings. It's an undertaking that has been quiet a few weeks in the making. We simultaneously launched a blog where it would be possible to showcase her work in a higher resolution than what would be possible on Etsy. We also sent out a newsletter to announce this to our family and friends with the request that it be forwarded to all of their contacts. The feedback so far has been positive.

The name '70 Popes' came from a book that we found at a car boot sale in Bahrain. A beautiful clothbound hardcover with a gold leaf printed spine, the book contained  page upon page of B&W line drawings of the Popes from Peter (Circa 33-67) to Paul VI who reigned from 1963 and was pope when the book was published in 1964. The book is a First Edition and we parted with our hard earned 25 fils for it. On taking it home we discovered beautiful Coats of Arms on the bookplate. These Coats of Arms numbering 70 in total was what inspired the name '70 Popes'.

We chose Red as the primary color of the logo reflecting the color of the book and the blue is the color of our bedroom.

Wish us luck.... and do visit our blog and shop.

Shop: www.70popes.etsy.com
Blog: www.70popes.blogspot.com
Email: 70popes@gmail.com
Related Posts with Thumbnails